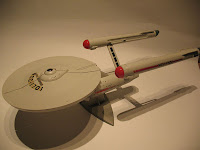
Tuesday, 30 July 2013

Enterprise-C - Background

I'm currently on vacation in France, far away from home and the workbench. Given my recent breakthrough with the airbrush in figuring out what the hell has been wrong with it for the many past months, I'm aching to get back home and do more tests and get some airbrushing done.

I've been busy reading up on the blogs of my fellow modeller-bloggers and decided that adding a little background or history to a model can be a nice touch. The last two assignments for the Sprue Cutters Union also made me realize I rather like writing about something else for a change, instead of just reporting progress (or lack thereof :-\) on one or more models.

As a first, I decided to do the Enterprise-C, since I know it's history by heart. I used to be a die-hard "Trekkie" back in the "nineties". The interest has since faded with the discontinuation of the series, but after 35 years, who can blame the producers.

All ships named Enterprise

The Enterprise with designation NCC-1701-C is the fifth of it's name. Like any vessel in our own history, each has a class designation, usually named after the first ship with that design.
Here's a list of all its namesakes within the Star Trek universe.
(All models shown were made about 10-15 years ago.)

NCC-1701
Constitution class

This is the ship as it was seen in the original Star Trek series (from 1966 until 1969) and the first 3 movies (The motion picture - 1979, The wrath of Khan - 1982 and The search for Spock - 1984). It was destroyed at the end of the 3rd movie.


My model of this ship was a cut-away version, showing the interior of the saucer, drive section and one warp nacelle.


NCC-1701-A
Constitution refit

Used in the movies 4 through 6 (The Voyage Home - 1986, The Final Frontier - 1989 and The Undiscovered Country - 1991), still with the crew of the original series.


I have an unassembled version of this model somewhere in the attic. It's just sprayed white. I'll probably finish it in one of the following months.


NCC-1701-B
Excelsior class

Used in the 7th movie (Generations - 1994) wherein it is badly damaged on it's maiden voyage, causing many of it's crew to go missing, presumed death. (Go watch the movie to see what really happened)


My model below.


NCC-1701-C
Ambassador class

This ship appears in only 1 episode of Star Trek : The Next Generation.
(More details at the end of this post)


I'm currently working on his model. The saucer was badly damaged, so I did an attempt at repairing it, but the damage will remain visible.


NCC-1701-D
Galaxy class

The flagship of the United Federation of Planets in Star Trek : The Next Generation, which was on TV from 1987 until 1994. Crash landed at the end of the 7th movie (Generations - 1994) rather spectacularly.


My first Star Trek model. The Aztec pattern took a looong time to finish, but I'm still happy with how it looks this early in my "modelling career".


NCC-1701-E
Sovereign class

Used in movies 8 through 10 (First Contact - 1996, Insurrection - 1998 and Nemesis - 2002), still with the cast of The Next Generation.


My model :


NX-01

Shown in the prequel series "Enterprise", aired from 2001 to 2005.


I do not own a model of this ship, but I never felt the same connection with it as with the other series and ships.

The story of the Enterprise-C

The Enterprise-C is encountered in one of the episodes of Star Trek : The Next Generation. The crew of the Enterprise-D is happily flying around until they discover an anomaly. It turns out to be a rift in the space-time continuum (such an easy fix to explain time-travel episodes) and out comes the Enterprise-C. At this time, the current reality is shifted into an altered state, but only one crewmember is aware of this.

In the "normal" reality, all that is know of the fate of the Enterprise-C is that it was destroyed some 20 years ago, defending a Klingon outpost (Narrendra III, if you like details) from a Romulan attack. The ship is presumed destroyed with all hands, but it's heroic act becomes the basis for forging an alliance between the Federation and the Klingon Empire.

In the "alternate" reality, the explosion that should have destroyed the Enteprise-C creates a rift in time and space and hurls it 20 years into the future. This way, it never defended the outpost for longer than a few minutes, it's heroic act was never that big of a deal and the alliance never happened. In our "modified" reality, the Federation is therefore still at war with the Klingons.

After a lot of talking (man, these 1990's sitcoms had a lot of talking!) the crew decides to send the Enterprise-C back where it came from, effectively ordering them to their death, but sacrificing one ship and crew to save billions of people by restoring the timeline.

Note : I do not yet feel up to the challenge of producing a battle-damaged Enterprise, so the model I'll be portraying dates from 3 seconds before the attack :-). 

Sprue Cutters Union #2 - Words of Wisdom

For our second assignment in the Sprue Cutters Union, we are asked the talk about the top three most significant things that have impacted our modelling, good or bad.

First, I thought this would be easy, but given the liberty to talk about techniques, tools, resources, etc. so much springs to mind that I really had to give this some thought. And to distill some actual "words of wisdom" from them didn't turn out so easy.

This promises to be a long post, so if the wall of text hurts your eyes, just read the parts marked in yellow.

Tools
Except for the airbrush, which is my best ally AND worst enemy, no specific tool comes to mind.

Techniques
Apart from one measly attempt at post-shading, I have tried very few techniques. I consider myself a beginner with much to learn, but I do hope to change that in the course of the following months and (probably) years.

Resources and advice
Given our access to the internet and a wide variety of forums, it's sometimes difficult to find actual advice. There is an abundance of information available, but it's sometimes difficult to find what you actually need. There are many magazines, like FineScale Modeler for instance, but if you want MY advice (see what I did there?), try to locate your local IPMS chapter or whatever modelling club is in the neighbourhood. There's nothing like taking your WIP ("Work in progress") model, sit at a table and let people with decades of experience judge your work or your mistakes. Be warned : one short question may result in a flood of information, as - in my experience - experienced modelers are all to eager to share there knowledge. Absorb their knowledge and don't be afraid to ask.

Now, let's start with my three "life changing" experiences:

#1 - My first "convention"

As I've already mentioned in my previous assignment for the Union, I started modelling at the age of 12, which would make that the year 1990. Back then, I would finish a model and buy a new one. There was no hobby store where I lived, I doubt I even knew the concept existed. I just bought al my models in "Blokker", which wasn't even a toystore, but sold common household items. They had a range of toys, Lego and some model airplanes and even a rack with a selection of Revell paint-bottles. I would just browse the shop and buy the model that most appealed to me. They usually had about 15-20 models to choose from.

A few years later (3 or 4, hard to say really), I was at an airshow (Koksijde, Belgium, if you must know) and wandered into a tent filled with models. I had never seen so many models in one room. The merchant was from London and had come all the way with hundreds (dare I say thousands?) of boxes, bags and goodies. Out of the corner of my eye, I spotted a familiar shape on a box under one of the tables, not on display. I asked if I could see it and the owner said he had several more of that line in his van. The box in question was the USS Enterprise, not the aircraft carrier, but the spaceship from Star Trek!
You have to understand, back then I was a HUGE fan of Star Trek - The Next Generation. I ended up going home with the Enterprise (NCC-1701-D) and a Klingon attack cruiser. We didn't have internet back then to do resech and shopping online, so the next several years, I hunted down airshows and conventions for all kinds of sci-fi-related models.

I handbrushed the Aztec pattern, but the lines for it were molded it,
so it wasn't that hard, only time-consuming.

Which words of wisdom do I extract from this?
At least once a year, find out of there's a convention in your neighbourhood

I'm not asking you to travel 5+ hours to go visit the IPMS National Convention. Something local will do. You find all kinds of merchandise in one spot, get exposed to models you've never heard of, see what other modellers are doing and maybe fall in love with something you'd never have expected to have an interest in. All this and more at usually very fair prices.

#2 - Coming back to the hobby

At the age of 23-24 (the year is 2002), I stopped modelling for some reason. I see it among many fellow modellers that, at some point, they put the hobby on hold.

Last year (almost to the day), I visited Normandy (France), with the mandatory tour of many museums, beaches and cemetaries. (Please tell me you know what D-day is?) At Arromanches, I was flabbergasted by what the Allied Forces pulled of. The sheer audacity and ingenuity of creating a floating harbour, pull it accross the channel and assemble it right under the enemies' nose was awe-inspiring.
Seeing all those beautifull dioramas triggered a dormant interest. I had never build a model tank and at the museum shop I was holding several models, trying to decide whether or not to start again. My girlfriend tried to persuade me to give it a try, but eventually I put them all back, thinking I'd never find enough time for this hobby again.

Two weeks later - at home again - I regretted my decision and decided to try it anyway and bought my first model tank. That's when I started this blog.


Words of wisdom?
No matter how much or how few time you can invest in a hobby, it is worth it.
I don't know who said the following, but it stuck in my mind when I read it : "A hobby is not something you do when you have time, it's what you make time to do."

Also : don't throw anything away if you put your hobby on hold. You'll be back :-).

#3 - The airbrush

One of the things I promised myself when I came back to modelling, was to learn how to use an airbrush. My older models were handpainted and it's not something I'm very skilled at.

If you follow my older posts, labelled airbrush, you can follow my (9-month) journey of learning to use it. It was not an easy road. For every 5 minutes of successful airbrushing, I spend many hours in frustration. At several points, I was hesitant to return to the workbench, just because it would only be frustrating again. If 10-year olds can handle an airbrush, certainly I should be skilled enough? I often wondered if something was wrong with the airbrush, but there are so many variables to consider (air pressure and paint consistency among many others) I wasn't entirely sure if it wasn't just me doing something wrong.

Just slightly over a week ago, I believe I made a breakthrough, when I accidentally discovered why the airflow accross the nozzle wasn't as it should be. As soon as I'm back from vacation, I will test this fully and hopefully you'll see happy posts with more airbrush successes from now on.

Edit : I forgot to mention that (when working as intended) the paintjob with an airbrush is sooo much nicer than with a brush. I know there are people who can do a stunning job with a simple brush, but for me that's impossible, and more than once detailed panel lines would be hidden under too thick a layer of paint. 

Words of wisdom?
Never give up. If at first you don't succeed, try again (and again, and again ...)

As a sidenote : don't waste 8 months like I did trying to figure out the problem. If you have reasonable doubt about the performance of any tool, take it to the shop and let them look at it. If they say it works fine, maybe find someone willing to assist you and show you the ropes a bit.


Part of being in the Union means we share links to our fellow contributors' posts. If you liked this post, take a look what some other modellers have to say about this topic:
The airbrush seems to be a recurring theme as a "life-changer" within the modeller community.

Tuesday, 23 July 2013

Sprue Cutters Union #1 - Your First

A new blogger incentive was launched this week : "The sprue cutters union". You can find it over at The Combat Workshop, which I just got to know today. There's a special assignment : each week a topic will be launched and all bloggers that want to participate are to write about it and share their post with the "union".

The first topic is "Your first model". 
As it so happens, my first post already mentioned my first model. I've only been blogging for a year, when I picked up my modelling hobby again after more than 10 years. 

The model

My first was Revell's 1/72 F-117A Shadowhawk. It was 1990 and I was 12. This was a new release and I had just watched a documentary about this amazing "invisible" fighter, so I just had to have it.


Building

I don't remember much about the build itself, parts fitting well or not. I do remember having to re-attach the bomb bay doors several times.

I painted every part on the sprue, because that was a tip from the Revell booklet in the box. It does make it easier to paint some parts like that, but in general you're best off painting in (sub-) assemblies. I just painted everything with one thick coat and put it together with sometimes generous amounts of glue. (Revell Contacta professional)

The downside of paint-first-assemble-later is that all the little details, like antennas and doors, are glued on top of the paint, which is far from an ideal bond and they do tend to drop off.

Painting

I didn't use primer, I didn't prepare the model by removing all possible oil or grime by washing it with detergent. One thick layer of brushed on (enamel) paint would never come loose.
I actually still have the paint bottle : Revell #9 Matt Anthracite. It cost 45 (belgian) franks in the day, which translates to € 1,01.

I don't think I've thrown ANYTHING away in those 20+ years.
Finishing

I did nothing special to the decals in the days. Now I would varnish a model with a gloss coat, place decals with microsol and microset, then seal them in with another coat of varnish.
Back then, the model was finished when the last decal was placed. They have silvered over time, but my old models have survived multiple decades surprisingly well.

Pictures

When I restarted the hobby last year, I unboxed all my old models and took new pictures. So, yes, I have pictures of my very first model.


Related posts

Participating in the topics of the Sprue Cutters Union means sharing links to the other's posts. Pay them a visit and check out their other stories.


Want to join the Sprue Cutters Union? Its simple. If you model and have a blog that is all you need to start. Just write a post in response to the weekly topic, copy the link in the comments section for that week's assignment and you're in! Check out more detail about joining the Sprue Cutters Union.

Monday, 22 July 2013

Like my button?

I've added a little "Like"-button beneath every post. It's not connected with Facebook whatsoever, so don't be afraid to click it. It's a complete standalone thingie. It's a little slow while loading, so sometimes it doesn't appear the first few seconds.

Right now, it's still an experiment, so feel free to give it a decent clicking, so I can gather and review the resulting statistics.

Saturday, 20 July 2013

Primer success

After my sudden revelation with the airbrush's airleak, I decided to push my luck and start priming the saucer of the Enterprise-C.

The airbrush behaved nicely and I only experienced a few moments of tip-dry every few minutes. I was able to prime the entire saucer's underside. 
Because this new-found problem and solution invalidates everything I tried in the past in regards to paint-consistency, I tried again with spraying primer straight from the bottle.

"Eureka" comes to mind! Straight from the bottle, it sprays a lot slower of course, but it doesn't run, it doesn't pool up (unless you hold the airbrush on the same spot for too long) and slowly but steadily, the entire saucer was covered in a first layer of primer. If you go back a few post, you see the black markings I made when making the latex mold. Those are nearly fully covered in the first go. 

I did have to refill the paintcup 4 or 5 times, but straight from the bottle, this is no problem at all.


The repaired section remains clearly visible of course, but I'm not going to try to hide it more. It's already better than I could have hoped for. Achieving a nearly-invisible fix is beyond my current skills.

One airbrush problem solved?

Something I've been noticing about the airbrush the last few weeks, is a problem with paint atomization. That's just a fancy word for the airflow blowing the paint from the needle into the air in really small particles.
I've had my share of issues with the airbrush so far, but this was new. 
It wasn't tip-dry because I had it almost all the time and cleaning the tip seemed not to help. 
It wasn't a bad paint consistency, because without the compressor on, the paint just drips out if I retract the needle. I sometimes had bubbles forming in the paintcup, almost as if there's a turbulence in front of the needle pushing air in instead of away from the tip.
When the brush IS blowing out paint, it's too wet and runny, indicating the paint is too thin, not too thick (because I've been working under the assumption the paint is too thick). So what's left that could be causing this?

I've come to the point where I've decided to buy a new airbrush, more expensive. It's just a matter of deciding which. I'm currently favouring the Badger Renegade Velocity, but I haven't yet made up my mind.

As if this decision triggered something, the following happened ...

While trying again to put some primer on the Enterprise, some paint accidentally made it on the front of the airbrush, where the needle cap is screwed into the nozzle cap. To my surprise, the paint started bubbling in a place where no bubbles should be forming.

I took my camera and shot the following video :


Even with the cap screwed on really hard, air still escapes, lowering the pressure in the front considerably and modifying the airflow into something I've already deemed unworkable.

After just a tiny bit of vaseline on the entire thread of the screw, a repeat test showed no bubbles whatsoever and a quick test with random paint showed a VAST improvement in paintflow.

Camouflage, round 5

The final colour to be added is "Camouflage green" (Vallejo 71.022), not "Tank green" as I previously indicated. Not that it matters THAT much which colours you decide to use.

Because of the particular problems with the airbrush these few weeks, paint doesn't always come out when and how I want it. The result is - again - too thick a layer of paint. For a base coat this isn't a real issue, but with all the masks in place, too much paint results in ugly ridges along the masking line, be it tape or putty or Maskol.


Speaking of Maskol, which is the liquid masking product from Humbrol I've been testing on this model. It removes rather easily and in one piece, not lifting any paint and not leaving behind any residue.

Because it stretches easily, it does tend to pull from underneath the paint, rather than cut off the paint edge where I want it (like is the case with tape), but that's more related to the thickness of the paint than the Maskol itself. This problem should resolve itself once I learn to put down thinner layers of paint.


With al the masks removed, this is the result. It's not as nice as I'd hoped. The edges of the white and black are rather ragged instead of clean and straight. I haven't done the turret yet, I'll try to get that one nicer.
Still, give me some time and I'll clean it up by hand, I hope.

At this point, every article I've read about camouflage tells me to "blend in the colours" by overspraying the entire model with (a heavily thinned version of) the base colour, lightly misting the paint over everything.
I'll be honest, I doubt I can pull that off, so I'm not going to do that. Maybe some day ...

Finished nacelles

Bracing myself for another airbrush disaster, I sat down to finish the previously masked stripes on the Enterprises nacelles. The mix used is 10% insignia blue and 90% white.


3 hours later, I removed all the masking tape and below is the result. I'm really happy working with the Tamiya tape. It doesn't lift any paint and if you take care to burnish it down really well, the painted edges are really sharp with no bleeding of the paint underneath.


I did have one spot where I cut the tape too deep and damaged the paint. Of all places, it had to be a spot where the primer hadn't completely taken and was letting go. So I had to remove a small piece of the paint and I'll need to fix it at a later point. (You can't see it in the photo).

Saturday, 13 July 2013

Camouflage, round 4

Added the final touches of Maskol, where black accents are needed. Only one final colour remaining : green.


Thursday, 11 July 2013

A whole lotta masking

I finally finished masking all the small lines that will be all over the nacelles. The left and right nacelles won't be 100% symmetrical, because I'm starting to become cross-eyed after 2 hours of placing tape, but since they're at least 20 cm apart on the model, nobody will notice a few millimeter-discrepancies.


On the very last part, I switched tactic. Instead of placing small strips, strips and more strips of tape, I masked the entire part with 3 wide strips and started cutting the desired shapes in the tape. The tricky part is not to cut too deep, so you don't scar the plastic under the tape. Let's just say it was nearing midnight and I needed to get it over and done with.
My free-hand cutting isn't as precise as I'd like and the lines aren't as straight as on the other parts. It's a lot easier to place and replace tape until it's right, but you only get one chance to cut a straight line.

Tuesday, 9 July 2013

Camouflage, round 3

The second colour to be added is black. This also will only be used in small accents. As soon as it is dry, I'll be adding Maskol and then prepare for the final colour (Tank green).

Paint consistency was a @#$% today. It was either spraying too heavily or not at all. Really difficult to handle the airbrush trigger if you don't know what to expect. Luckily we're not doing fine details on a finished model, so a little too much paint in certain places isn't a big issue.


Dullcoat

Because someone (correctly) remarked my Puma was too shiny, I wanted to add another layer of clear. Alclad's matte clear kote changed nothing to the appearance, but Vallejo matt varnish did a better job. I thinned it 50%, but next time I'm going to thin even more, because there's still a kind of milky sheen about this coat of varnish.


The second photo best shows off the result. The body has been coated with matt varnish, the turret has not, just to see the difference.


Enterprise, nacelle progress

I started work on the nacelles, because they are easy to hold and the paintjob is straightforward.

I waited a day between sessions, just so the paint could thoroughly cure. It's not needed if you're applying layers over layers, but with the masking tape, I don't want to risk lifting paint.
  • White primer on saturday
  • Blue accents on sunday
  • Masking on monday
  • Light-grey base coat on tuesday


I masked the area around the blue accents, just to avoid getting the blue paint where it will be overcoated with grey later. It's easier to get the lightgrey right, if other colours aren't trying to bleed through.

For the blue I used 80% white and 20% Insignia Blue (Vallejo 71.091)
For the ever so slightly orange yellow parts, I mixed Flat Yellow (70.953) with a touch (of a toothpick) of Transparent Red (70.934). Why transparent? Because it's the only red I have that is not too brownish. As a modeller, you need to be able to work with what you got.


After 24 hours, I masked the blue accents with Tamiya tape. I spend about half an hour doing this, but I find it strangely relaxing and satisfying work. If only Tamiya would make masking tape of 7 mm (instead of 6, 10 or 18 mm), I could have finished in half the time.
The irregular shaped sides of the Bussard ramscoops (sue me for knowing what they're called) were masked with (pink) silly putty, because it's easier to maneuver around irregular places than masking tape.


A lightgrey coat is sprayed over the entire nacelles. I used 80% white and 20% lightgrey (Vallejo 71.050).

Sunday, 7 July 2013

Camouflage, round 2

After a second layer of white, the result is good enough to start with the next colour. Not good enough if this were to be a white car, for instance, but since I'll be mudwashing the tank anyway, nobody will notice the paintjob isn't perfect.


I'm using Humbrol Maskol to mask the really small accents and more putty is added where it is easier.
I'm hoping the Maskol doesn't turn out to be a disappointment, after I've added 4 layers of paint.


Friday, 5 July 2013

I think I'm in love

Just found this one on the site of Meng-Model. If I can hold off buying any new kits until a few more are finished, this will be my next purchase.

Meng-model's 1/35 Merkava Mk.3 BAZ