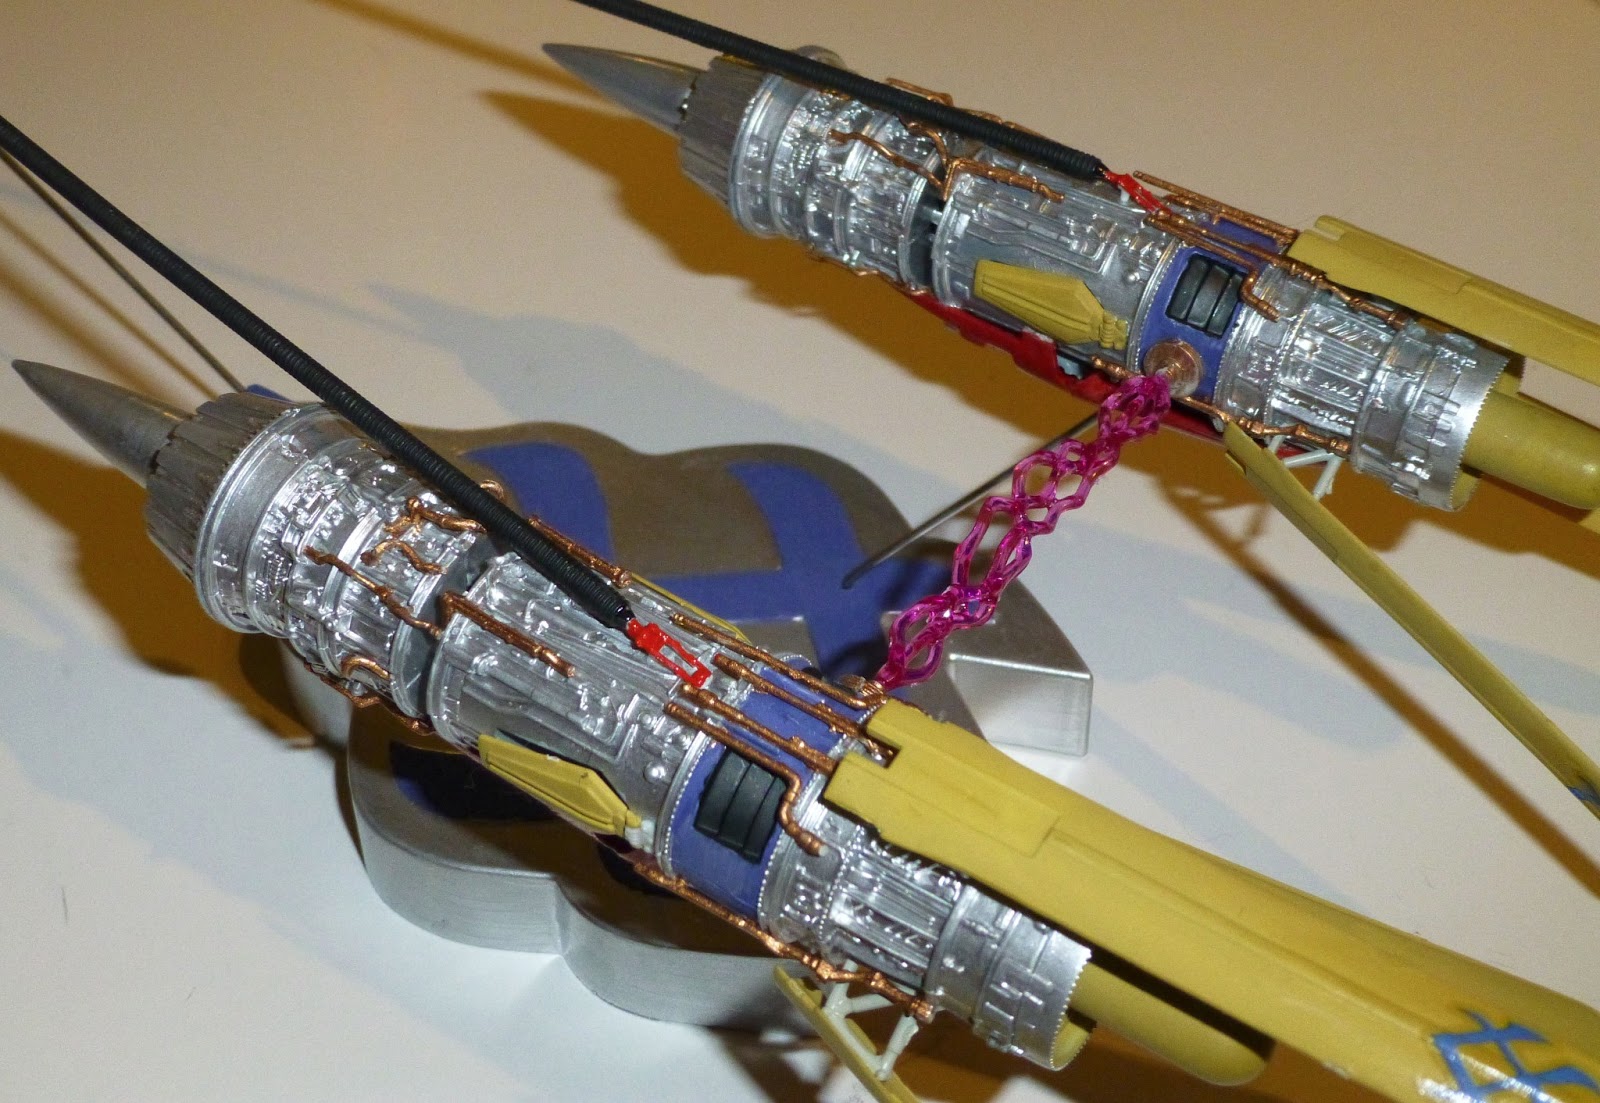
Earlier this week, I fished a very old model out of the closet : Anakin's podracer from Star Wars : Episode 1.
Many years ago, it was about 95% finished, painted and decals placed. Only some final assembly was needed. The paintjob is far from perfect, but nice enough. Redoing it is impossible and tackling the decals would probably ruin them.
Tuesday, 26 March 2013
Saturday, 9 March 2013
Clear gloss is tricky stuff
Since I was at my workbench anyway, the last thing I did with the airbrush was try some more gloss-coating the submarine. I sprayed it 1) thinned with the dedicated thinner, 2) straight from the bottle and 3) thinned with water.
I'm not sure if there was residue from the previous paint or just something iffy, but the first minute it sprayed light and decent (would need 4 coats to cover, but I can live with that), but then it started acting up again. Thinning with water was too runny. It's all dried up now and there's a big dry blob on the bottom of the nose, where it all pooled up.
Nothing a little sanding won't fix, I hope. Anyway, I know now that there's a "sweet" spot for thinning clear gloss (NOT with water) that I have to aim for and if it starts spraying a milky white sheen, I have to stop immediately.
I guess I can officially declare this sub a test-kit, because I doubt I'll ever get it the way I want it. Since all my kits have to be clearcoated at some point, best to keep practicing on the same model until I get it right.
I can do airbrush me
Another practice session, to put the Abrams in a coat of primer. I thinned the grey primer with water for the first time and the results are rather satisfying. Not perfect, but adequate.
Top half and the turret primed in grey. The underside and the wheels are primed in black. For the underside (and the inside of the fenders), I choose black, because I hope it will look a darker shade of the yellow I'll put over it.
For the wheels, it's just a practicality, since they'll be half black anyway.
Further airbrushing with dark yellow for the Puma and gold for the Enterprise yielded various degrees of success, but all in all it was a good session.
Top half and the turret primed in grey. The underside and the wheels are primed in black. For the underside (and the inside of the fenders), I choose black, because I hope it will look a darker shade of the yellow I'll put over it.
For the wheels, it's just a practicality, since they'll be half black anyway.
Further airbrushing with dark yellow for the Puma and gold for the Enterprise yielded various degrees of success, but all in all it was a good session.
Tuesday, 5 March 2013
Testing another airbrush
At the monthly IPMS meeting, one of the members brought his airbrush for others to try out and toy around with. There are many members new to airbrushing (including me), so this was the ideal opportunity to test a new or different model.
It was a bottom feed but I doubt that changes much. It sprayed a lot less paint than my own, but it did it consistently. The most important thing I noticed is that it just sat there, used by different persons during at least 5 minutes and dry-tip never occured. He was spraying Tamiya acrylics, thinned with water. It's difficult to say if it's better paint or just a better airbrush. There's so many variables to play around with, it's hard to find which combo is most effective.
Got some new tips and ideas to play around with for the next airbrush session. Mainly : more thinning and thinning with water (so far, I only thinned with the Vallejo thinner).
I'll try not to let it rest another 2 months. As long as 50% of what I'm doing looks good, I must not see it as a half-failed session, but as practice. It's a difficult tool to get to know, so I shouldn't quit after a mere 20 hours of practicing.
It was a bottom feed but I doubt that changes much. It sprayed a lot less paint than my own, but it did it consistently. The most important thing I noticed is that it just sat there, used by different persons during at least 5 minutes and dry-tip never occured. He was spraying Tamiya acrylics, thinned with water. It's difficult to say if it's better paint or just a better airbrush. There's so many variables to play around with, it's hard to find which combo is most effective.
Got some new tips and ideas to play around with for the next airbrush session. Mainly : more thinning and thinning with water (so far, I only thinned with the Vallejo thinner).
I'll try not to let it rest another 2 months. As long as 50% of what I'm doing looks good, I must not see it as a half-failed session, but as practice. It's a difficult tool to get to know, so I shouldn't quit after a mere 20 hours of practicing.
Saturday, 2 March 2013
Once more unto the breach
After more than 2 months, I really needed to practice some more airbrushing. There's only so much you can do on a model without the need for painting, and I don't want to just glue them together and start on the next.
I started priming the less visible places of the Abrams. I did the inside of the fenders with black primer. Following a recent tip, I did long strokes accross the entire model, slowly building up paint coverage. This went really well. The dry-tip is almost under control, although it's still needed far too frequently, if you ask me.
Constantly cleaning the tip does leave residue and paint flakes in the nozzle and around the tip, which results in the occasional splotch ending up in the paintwork. I think I just want to do too much in one go and need to stop to clean the nozzle more often.
Switching to the grey primer again was more difficult. I'm not sure if I didn't clean the brush poroperly or if there's something iffy about this particular paint. Coverage just seems difficult to get, unless I paint it really wet. I stopped halfway to let it dry and add a second layer later.
The current problem is that there seems to be a buildup of paint on the bottom of the nozzle. Since it's pointed away from me, I only notice this when it's too late, i.e. when numerous thick drops of paint suddenly fly towards the model and ruin the paintjob.
Lastly, I tried putting another coat of gold on the Enterprise's display stand, but here also the droplets of paint made it worse instead of better.
Examing the airbrush, when I retract the needle from the nozzle, I noticed that the needle is not centered inside the nozzle but sticks to one side. The needle is not bent, because if I turn it 180 degrees, it still sticks to the same side of the nozzle. It must be the internal guidance of the needle somewhere. I've yet to determine if this is the cause or has nothing to do with the current issues.
I started priming the less visible places of the Abrams. I did the inside of the fenders with black primer. Following a recent tip, I did long strokes accross the entire model, slowly building up paint coverage. This went really well. The dry-tip is almost under control, although it's still needed far too frequently, if you ask me.
Constantly cleaning the tip does leave residue and paint flakes in the nozzle and around the tip, which results in the occasional splotch ending up in the paintwork. I think I just want to do too much in one go and need to stop to clean the nozzle more often.
Switching to the grey primer again was more difficult. I'm not sure if I didn't clean the brush poroperly or if there's something iffy about this particular paint. Coverage just seems difficult to get, unless I paint it really wet. I stopped halfway to let it dry and add a second layer later.
The current problem is that there seems to be a buildup of paint on the bottom of the nozzle. Since it's pointed away from me, I only notice this when it's too late, i.e. when numerous thick drops of paint suddenly fly towards the model and ruin the paintjob.
Lastly, I tried putting another coat of gold on the Enterprise's display stand, but here also the droplets of paint made it worse instead of better.
Examing the airbrush, when I retract the needle from the nozzle, I noticed that the needle is not centered inside the nozzle but sticks to one side. The needle is not bent, because if I turn it 180 degrees, it still sticks to the same side of the nozzle. It must be the internal guidance of the needle somewhere. I've yet to determine if this is the cause or has nothing to do with the current issues.
Sunday, 24 February 2013
Painting the fiddly bits
Small parts are usually difficult to paint. You can attach them to your model, but then you can't really airbrush them and you'll have to be really careful with a paintbrush. Or you can paint them separately.
If they have attachment pins, you can use alligator clips. These wil hold on to pins less than a millimeter in size. Mount them on a toothpick and you're ready to paint.
For the wheels, I just use toothpicks. If the holes are too big, I use a small ball of silly putty for every wheel to hold the toothpick in place. Silly putty will usually stay in one piece when you remove it afterwards, whereas normal "plasticine" will break apart and you'll never get the axle-whole clean. Since the wheels have to rotate freely on their axle, I want as little goo as possible to remain behind.
Some parts don't even have pins, like the stowage bins and jerrycans I made last time for the Abrams.
You can hold them in your hand and paint the sides you can see, but then you get paint on your hand and you have to paint it in 2 or 3 sessions. You could hold them with tweezers, but even then accidents usually happen when you try to put the part down to dry. It always falls on a painted side (Damn you, Murphy's law!)
After reading this tip in FSM, now I just glue a toothpick to the bottom with white glue (Elmer's glue, "wood" glue, ... whatever you call it). It will stick firmly enough so you can airbrush almost the entire part and you can pin it somehere to dry. When done, the glue easily snaps off clean, leaving no trace behind. You still have to do the bottom afterwards, but it's much more controlled and almost accident-proof.
Below the entire ensemble of all the small parts for the Abrams. Some alligator clips on the left side.
I'll try to gather some courage soon to get behind the airbrush-desk again.
If they have attachment pins, you can use alligator clips. These wil hold on to pins less than a millimeter in size. Mount them on a toothpick and you're ready to paint.
For the wheels, I just use toothpicks. If the holes are too big, I use a small ball of silly putty for every wheel to hold the toothpick in place. Silly putty will usually stay in one piece when you remove it afterwards, whereas normal "plasticine" will break apart and you'll never get the axle-whole clean. Since the wheels have to rotate freely on their axle, I want as little goo as possible to remain behind.
Some parts don't even have pins, like the stowage bins and jerrycans I made last time for the Abrams.
You can hold them in your hand and paint the sides you can see, but then you get paint on your hand and you have to paint it in 2 or 3 sessions. You could hold them with tweezers, but even then accidents usually happen when you try to put the part down to dry. It always falls on a painted side (Damn you, Murphy's law!)
After reading this tip in FSM, now I just glue a toothpick to the bottom with white glue (Elmer's glue, "wood" glue, ... whatever you call it). It will stick firmly enough so you can airbrush almost the entire part and you can pin it somehere to dry. When done, the glue easily snaps off clean, leaving no trace behind. You still have to do the bottom afterwards, but it's much more controlled and almost accident-proof.
Below the entire ensemble of all the small parts for the Abrams. Some alligator clips on the left side.
I'll try to gather some courage soon to get behind the airbrush-desk again.
Friday, 22 February 2013
Vinyl tracks, hot screwdriver
Time to assemble the tracks for the Abrams tank. The instructions simply say to use a hot screwdriver. Searching online did not give me that much information. I guess every modeller needs to find out for himself how to do it without messing it up.
The idea is to put the four pins through the holes at the other end, then use a hot scredriver to flatten the pins like a rivet. The result should look like a small mushroom, preventing the pin from fitting through the hole again. My immediate questions : 1) how hot? 2) how much pressure?
I started by holding a screwdriver in a candle flame for 5 seconds (nothing), than 10 (still nothing), than 15 ... until the plastic started melting. At 25 seconds, it became hot enough to melt the pin.
I pushed it down, which did flatten it, but I pushed too hard, I think. A combination of pushing too far down and too much heat ruined the pins : the plastic burnt and stuck to the screwdriver and nothing of the pin was left to keep it in place.
The first track is no success, even though it does remain closed. It looks like it barely holds together. I do not want to test how much force it can take. The model is not meant to actually be played with, so it's no real disaster.
For the second track, I heated the screwdriver less and pushed down slower and not all the way down. I stopped about 1/2 mm from the actual track. Now the intended "mushroom" effect is much more obvious and how I intended it.
An angled view may give you a better idea of how big I left the "head" of the pin.
Below is how it looks assembled on the actual tank. I've yet to decide how to paint the tracks, but I can finish the rest and do that later.
The idea is to put the four pins through the holes at the other end, then use a hot scredriver to flatten the pins like a rivet. The result should look like a small mushroom, preventing the pin from fitting through the hole again. My immediate questions : 1) how hot? 2) how much pressure?
I started by holding a screwdriver in a candle flame for 5 seconds (nothing), than 10 (still nothing), than 15 ... until the plastic started melting. At 25 seconds, it became hot enough to melt the pin.
I pushed it down, which did flatten it, but I pushed too hard, I think. A combination of pushing too far down and too much heat ruined the pins : the plastic burnt and stuck to the screwdriver and nothing of the pin was left to keep it in place.
The first track is no success, even though it does remain closed. It looks like it barely holds together. I do not want to test how much force it can take. The model is not meant to actually be played with, so it's no real disaster.
For the second track, I heated the screwdriver less and pushed down slower and not all the way down. I stopped about 1/2 mm from the actual track. Now the intended "mushroom" effect is much more obvious and how I intended it.
An angled view may give you a better idea of how big I left the "head" of the pin.
Below is how it looks assembled on the actual tank. I've yet to decide how to paint the tracks, but I can finish the rest and do that later.
Saturday, 16 February 2013
Abrams, construction (almost) completed
Step 7 (continued)
Finished adding the side-rails. The 2 machine-guns will be added after the tank is finished, because they're bound to break off during painting and finishing.
When you add the main gun, make sure your elevation is high enough. There are no locator pins to tell you how it should be attached, but make sure you fit the turret on the lower hull before the glue sets, because you want to check if the turret can rotate 360 degrees without bumping into anything.
Step 8 : Rear basket
The rear basket assembly is easy, except for the mesh. You have to cut the 2 pieces to size from the provided mesh. There's a template in the manual, but it's totally inaccurate. A lot of fitting and cutting is required and even now I'm not completely happy with the result.
Again, make sure the basket sits high enough, so it doesn't scrape against the lower hull.
The turret is now complete, except for some additional stowage which will be added after painting.
Step 9 : Fenders and tracks
This step tells you to add the fenders and the tracks and glue the upper hull to the lower. I suggest you skip attaching the hull halves, since some of the wheels become inaccesible because of the fenders, and you may want to hold off wheels and tracks until painting is done.
The tank is now as good as complete. Shown here with everything except the wheels and tracks.
Step 10 : Stowage and accesories
Additional boxes and jerrycans, some equipment I do not know. To be painted in different colors, so I'm keeping these off the model until the very last moment.
Finished adding the side-rails. The 2 machine-guns will be added after the tank is finished, because they're bound to break off during painting and finishing.
When you add the main gun, make sure your elevation is high enough. There are no locator pins to tell you how it should be attached, but make sure you fit the turret on the lower hull before the glue sets, because you want to check if the turret can rotate 360 degrees without bumping into anything.
Step 8 : Rear basket
The rear basket assembly is easy, except for the mesh. You have to cut the 2 pieces to size from the provided mesh. There's a template in the manual, but it's totally inaccurate. A lot of fitting and cutting is required and even now I'm not completely happy with the result.
Again, make sure the basket sits high enough, so it doesn't scrape against the lower hull.
The turret is now complete, except for some additional stowage which will be added after painting.
Step 9 : Fenders and tracks
This step tells you to add the fenders and the tracks and glue the upper hull to the lower. I suggest you skip attaching the hull halves, since some of the wheels become inaccesible because of the fenders, and you may want to hold off wheels and tracks until painting is done.
The tank is now as good as complete. Shown here with everything except the wheels and tracks.
Step 10 : Stowage and accesories
Additional boxes and jerrycans, some equipment I do not know. To be painted in different colors, so I'm keeping these off the model until the very last moment.
IPMS Ghent
Last night, I paid a visit to IPMS Ghent, the local chapter of the "International Plastic Modelers' Society".
The ambiance was fun and relaxed. People were showing off their latest creation (someone just finished a diorama, on which he worked for 2 years) or just the latest kit they picked up and discussing what they intended to do with it.
As for myself, I brought the Jaguar - the first kit I finished in over 10 years - and braced myself for the reactions. I recieved a lot of tips for masking, painting, weathering, ... too much to take in at once. The main thing I remembered is what I had already learned myself : be more patient while airbrushing. They can clearly see I covered it too fast and too thick. If you need to paint 20 layers, do so, but do it slowly.
Several members had also started their modelling career with the Revell airbrush, and when asked if free-hand camouflage (for the M60 and the Puma) would be doable, the reactions were unanymous : NO.
I'll have to postpone further work on those models until I buy a better airbrush, so I'll be focusing on the non-camouflage models for the time being.
I learned more in those 2-3 hours talking to experienced (and beginner) modellers then I'll learn from reading 50 magazines. I recommend everyone to look up local IPMS chapters, or unaffiliated modelling clubs, to share (or learn) ideas and knowledge.
The ambiance was fun and relaxed. People were showing off their latest creation (someone just finished a diorama, on which he worked for 2 years) or just the latest kit they picked up and discussing what they intended to do with it.
As for myself, I brought the Jaguar - the first kit I finished in over 10 years - and braced myself for the reactions. I recieved a lot of tips for masking, painting, weathering, ... too much to take in at once. The main thing I remembered is what I had already learned myself : be more patient while airbrushing. They can clearly see I covered it too fast and too thick. If you need to paint 20 layers, do so, but do it slowly.
Several members had also started their modelling career with the Revell airbrush, and when asked if free-hand camouflage (for the M60 and the Puma) would be doable, the reactions were unanymous : NO.
I'll have to postpone further work on those models until I buy a better airbrush, so I'll be focusing on the non-camouflage models for the time being.
I learned more in those 2-3 hours talking to experienced (and beginner) modellers then I'll learn from reading 50 magazines. I recommend everyone to look up local IPMS chapters, or unaffiliated modelling clubs, to share (or learn) ideas and knowledge.
Sunday, 10 February 2013
Abrams, further construction.
Step 4 : Turret
The two turret halves do not fit particularly nice, so lots of tape is needed.
Tape can only get you so far. Sometimes the parts are slightly warped or simply don't fit very well. The only way to get them to stick right is to put on glue, take it in your hands, apply pressure where the parts don't meet perfectly and hold them like that.
If there's not too much misalignment, a few minutes should be enough to keep the parts sticking together how you want them. If not, you'll need extra tools - like a clamp, for instance - and let it sit overnight for the glue to completely cure.
Step 5
The smoke grenade launchers (I chose the Marine version of the 2 construction options) consist of 18 pieces each. They're really tiny, but construction is straightforward.
I'm not sure if it's really necessary to model each launch tube in 2 parts or if it just an easy way to up the part count.
The second part is some kind of lookout window (I'm not familiar with all the technical terms concerning tanks), with a clear window. Part J71 is shown in the assembly, but not labelled in the instructions, so you just need to go look for the part that looks like it.
I've postponed adding part B25 (the bottom) because I want to paint it first, and only then add the clear part, for which B25 would be in the way.
Step 6 : Stowage and hatches
The side rails consist of 9 parts for each side (not counting the back, which has a lot more rails and pieces), but assembles easily.
The hatch assembled in the previous step (D2 + D12) is shown open, but I suggest you close it. The interior of the tank is empty, so why open a hatch if you have nothing to show off? The commander is included in the kit, but the manual does not mention him. Since I intend to place my Abrams on the M1000 HETS, it's better not to add any personnel.
If you close the hatch, the support arms appear too long. I cut them in half near the joint, removed about 1-2 mm and reattached them. Traces of my modification are visible, but once painted, it'll be ok.
Step 7 : Weapons
Construction of two machineguns and the main gun. It's not 100% clear to me yet how to position the main gun. There are no locator pins and there's quite a lot of wiggle room to position it up or down. Since I want to position it in transport, I'll position the barrel is low as possible.
The two turret halves do not fit particularly nice, so lots of tape is needed.
Tape can only get you so far. Sometimes the parts are slightly warped or simply don't fit very well. The only way to get them to stick right is to put on glue, take it in your hands, apply pressure where the parts don't meet perfectly and hold them like that.
If there's not too much misalignment, a few minutes should be enough to keep the parts sticking together how you want them. If not, you'll need extra tools - like a clamp, for instance - and let it sit overnight for the glue to completely cure.
Step 5
The smoke grenade launchers (I chose the Marine version of the 2 construction options) consist of 18 pieces each. They're really tiny, but construction is straightforward.
I'm not sure if it's really necessary to model each launch tube in 2 parts or if it just an easy way to up the part count.
The second part is some kind of lookout window (I'm not familiar with all the technical terms concerning tanks), with a clear window. Part J71 is shown in the assembly, but not labelled in the instructions, so you just need to go look for the part that looks like it.
I've postponed adding part B25 (the bottom) because I want to paint it first, and only then add the clear part, for which B25 would be in the way.
Step 6 : Stowage and hatches
The side rails consist of 9 parts for each side (not counting the back, which has a lot more rails and pieces), but assembles easily.
The hatch assembled in the previous step (D2 + D12) is shown open, but I suggest you close it. The interior of the tank is empty, so why open a hatch if you have nothing to show off? The commander is included in the kit, but the manual does not mention him. Since I intend to place my Abrams on the M1000 HETS, it's better not to add any personnel.
If you close the hatch, the support arms appear too long. I cut them in half near the joint, removed about 1-2 mm and reattached them. Traces of my modification are visible, but once painted, it'll be ok.
Step 7 : Weapons
Construction of two machineguns and the main gun. It's not 100% clear to me yet how to position the main gun. There are no locator pins and there's quite a lot of wiggle room to position it up or down. Since I want to position it in transport, I'll position the barrel is low as possible.
Subscribe to:
Posts (Atom)